Baking Bread - Proving
Proving is when the yeast dough is allowed to rest and rise a final time before baking.
During proving, yeast ferments the dough and produces gases, which makes the dough much lighter and softer resulting in a well-risen loaf.
Step 1 - The Container
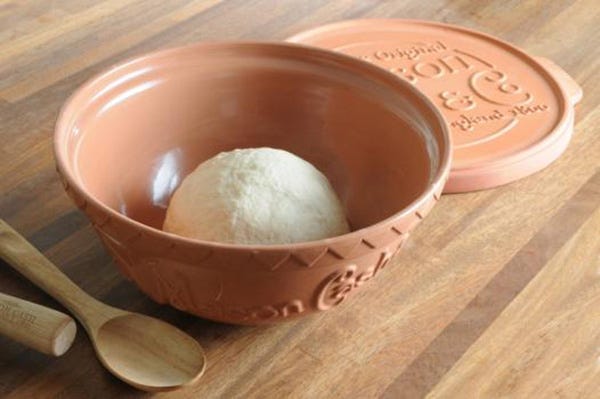
- Now that your dough has been mixed it’s time to prove your bread. First, you need to find a container in which your dough can comfortably double in size without billowing over the top. This may well be the mixing bowl you started off with, but give it a quick wipe first and dry with a tea towel.
Step 2 - Flouring Or Oiling The Surface
- Now, you can either flour the surface of the dough, or oil it. Oiling is slightly better than flouring, as it makes an airtight coating, which prevents the dough from drying out. It also enables you to oil the container, which makes it easier to turn the dough out later. (Don’t oil the container if you have floured the dough as you will just make oily flour lumps.)

Step 3 - Covering The Dough
- Whichever you decide, put the dough into the container and cover it. We find the simplest way is to put the container in a bin liner and tuck the opening underneath. This makes a lovely environment for your dough – a little humidity from the fermentation process and a little extra warmth from the bag (black absorbs and radiates heat). Covering the bowl with cling film would be nearly as good, though a little more wasteful, as you can't reuse it.

Step 4 - The First Rise
- Now you need to leave your dough to rise in a warm place. A pleasantly heated kitchen is ideal, but proofing bread in a slightly cold kitchen is still fine – the dough will just take longer to rise. An airing cupboard, with the boiler going, is likely to be too warm. On top of the Aga is too warm. For a really slow overnight rise, you could put the covered dough in the fridge, but you will rarely want to (unless you are making brioche).
Step 5 - Doubling In Size
- During this period of rising, the gluten should be stretched by the activity of the yeast to the limit of its elasticity, at which point the dough will have roughly doubled in size. Beyond this, the dough noticeably loses its structure and elasticity; it will start to look flaccid and a bit holey. This is not a disaster, but the dough will be a little weaker for it.
Step 6 - Knocking Back The Dough
- Once the dough has risen sufficiently, uncover and tip it out on to a slightly floured work surface. Gently press into the dough with your fingertips and squash it all over until it is roughly the size you started with. A common term for this is ‘knocking back’.
Step 7 - The Second Rise
- You can now leave your dough to rise a second time, following the same spinning and shaping process as before, in order to further mature and improve it. You can even repeat the rising and deflating process three, four maybe five times, Each time you’ll notice the dough becoming more satiny and pillow like. You cannot do this indefinitely though. Eventually there will be no sugars left for the yeast to feed on, and you need it to have enough oomph for the final prove before baking.
Why not try these delicious bread recipes or look at more of our bread tutorials?
Frequently asked questions
How to prove bread without a proving drawer?
The process is pretty straightforward. Put the dough in a greased bowl, cover with cling film or a damp tea towel. If your kitchen is warm, you can let the dough rise on your counter. But if your kitchen is cool, place the covered bowl of dough over a pan of warm to hot water and leave it on your counter.
How to tell if bread is proofed?
To check that the dough is proofed and ready to bake, gently press it with your knuckle or finger. If the dough immediately springs back, it needs longer. If it springs back slowly, leaving a small indent, the dough is ready to bake.
How to tell if bread is over proved?
Over proofing occurs when the dough has been proofed for too long and all the air bubbles have burst. If you poke your dough and it doesn't bounce back at all, you've over proofed it.
Can I use my oven as a proving oven?
Yes! In order to proof bread in an oven, a glass baking dish should be placed on the bottom rack and filled with boiling water. The dough should then be stored on the centre or top rack and the door should be closed. The steam and warmth generated by the boiling water will provide the dough in a warm, steamy environment, which is ideal for a successful rise.